> ## Documentation Index
> Fetch the complete documentation index at: https://termmate.app/docs/llms.txt
> Use this file to discover all available pages before exploring further.
# Prerequisites
> Install and authenticate the Claude Code or Codex CLI agents that power TermMate's chat sessions inside Sublime Text and VS Code editors.
TermMate connects to external CLI-based agents to drive its core capabilities. Complete the steps below before starting a chat session.
## 1. Install TermMate
### Sublime Text
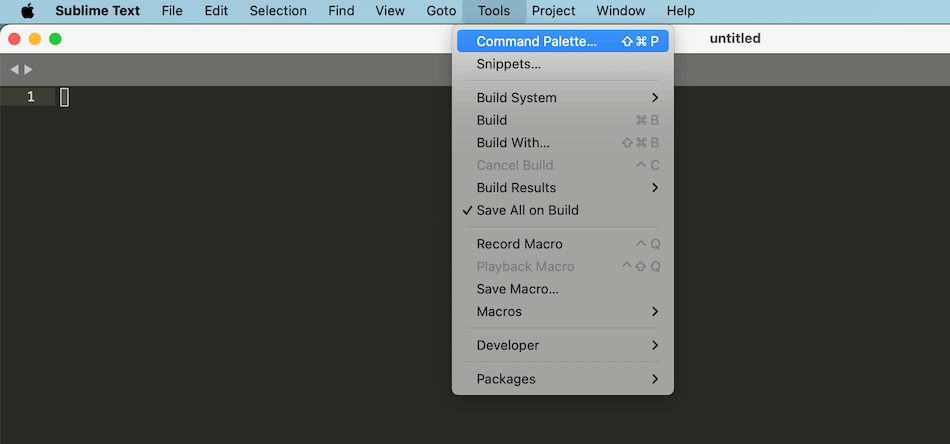 Install TermMate via [Package Control](https://packagecontrol.io/packages/TermMate):
1. Open the Command Palette (`Cmd+Shift+P` on macOS, `Ctrl+Shift+P` on Windows/Linux).
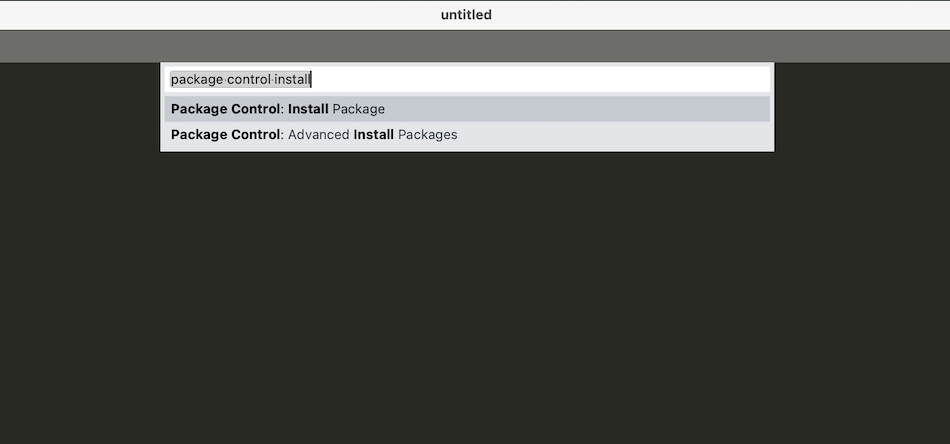
2. Type `Package Control: Install Package` and press `Enter`.
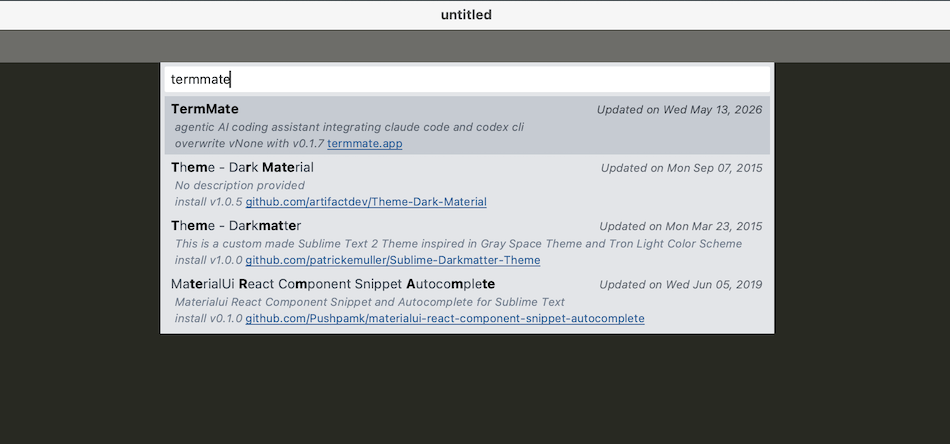
3. Search for `TermMate` and press `Enter`.
Install TermMate via [Package Control](https://packagecontrol.io/packages/TermMate):
1. Open the Command Palette (`Cmd+Shift+P` on macOS, `Ctrl+Shift+P` on Windows/Linux).
2. Type `Package Control: Install Package` and press `Enter`.
3. Search for `TermMate` and press `Enter`.
 ### VS Code
Install TermMate from the Visual Studio Code Marketplace:
[marketplace.visualstudio.com → TermMate](https://marketplace.visualstudio.com/items?itemName=termmate-app.termmate-vs)
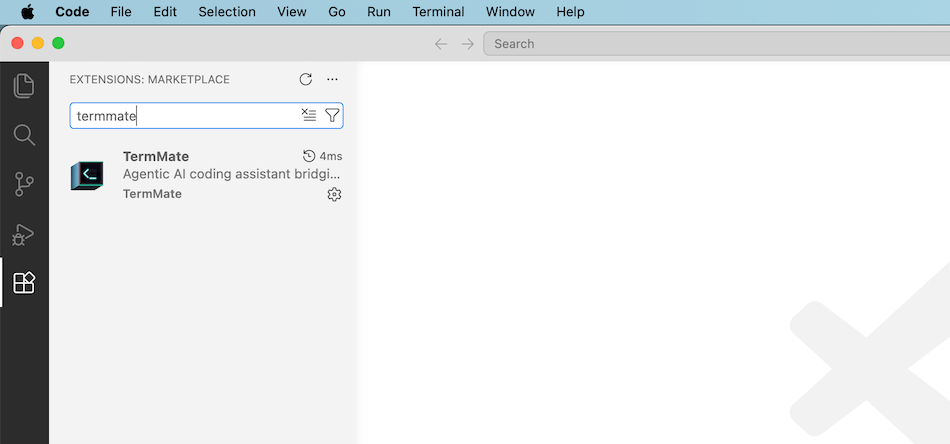
Or search **TermMate** directly in the VS Code Extensions panel (`Cmd+Shift+X`).
### VS Code
Install TermMate from the Visual Studio Code Marketplace:
[marketplace.visualstudio.com → TermMate](https://marketplace.visualstudio.com/items?itemName=termmate-app.termmate-vs)
Or search **TermMate** directly in the VS Code Extensions panel (`Cmd+Shift+X`).
 ## 2. Install Agent CLI
The easiest way to install an agent is directly from within your editor: open the Command Palette, type `TermMate: Install Agent`, and select the agent you want. TermMate will run the installation in a dedicated panel and notify you when it's complete. You can also run `TermMate: Install Agent` at any time later to add more agents.
**Or install manually from your terminal:**
### Claude Code (Recommended)
Claude Code is Anthropic's official terminal-based coding agent.
```bash theme={null}
curl -fsSL https://claude.ai/install.sh | bash
```
### Codex
Codex is OpenAI's coding agent.
```bash theme={null}
curl -fsSL https://chatgpt.com/codex/install.sh | sh
```
```powershell theme={null}
powershell -ExecutionPolicy ByPass -c "irm https://chatgpt.com/codex/install.ps1 | iex"
```
### Pi Agent
Pi Agent is a Gemini-powered coding agent by Pi.
```bash theme={null}
curl -fsSL https://pi.dev/install.sh | sh
```
TermMate automatically detects CLI installation paths across multiple environments, including **Homebrew**, **npm-global**, **Yarn**, and common local binary directories. You typically don't need to manually configure environment variables or search paths.
## 3. Authentication
Once installed, authenticate the agents via your terminal before starting a session in TermMate. Alternatively, you can skip CLI login by setting API keys directly in TermMate's settings (`Preferences → Package Settings → TermMate → Settings`):
```json theme={null}
{
"env": {
"ANTHROPIC_API_KEY": "sk-ant-...",
"OPENAI_API_KEY": "sk-...",
"GEMINI_API_KEY": "your-gemini-api-key"
}
}
```
### Claude Code
```bash theme={null}
/login
```
### Codex
```bash theme={null}
codex login
```
### Pi Agent
```bash theme={null}
/login
```
## 2. Install Agent CLI
The easiest way to install an agent is directly from within your editor: open the Command Palette, type `TermMate: Install Agent`, and select the agent you want. TermMate will run the installation in a dedicated panel and notify you when it's complete. You can also run `TermMate: Install Agent` at any time later to add more agents.
**Or install manually from your terminal:**
### Claude Code (Recommended)
Claude Code is Anthropic's official terminal-based coding agent.
```bash theme={null}
curl -fsSL https://claude.ai/install.sh | bash
```
### Codex
Codex is OpenAI's coding agent.
```bash theme={null}
curl -fsSL https://chatgpt.com/codex/install.sh | sh
```
```powershell theme={null}
powershell -ExecutionPolicy ByPass -c "irm https://chatgpt.com/codex/install.ps1 | iex"
```
### Pi Agent
Pi Agent is a Gemini-powered coding agent by Pi.
```bash theme={null}
curl -fsSL https://pi.dev/install.sh | sh
```
TermMate automatically detects CLI installation paths across multiple environments, including **Homebrew**, **npm-global**, **Yarn**, and common local binary directories. You typically don't need to manually configure environment variables or search paths.
## 3. Authentication
Once installed, authenticate the agents via your terminal before starting a session in TermMate. Alternatively, you can skip CLI login by setting API keys directly in TermMate's settings (`Preferences → Package Settings → TermMate → Settings`):
```json theme={null}
{
"env": {
"ANTHROPIC_API_KEY": "sk-ant-...",
"OPENAI_API_KEY": "sk-...",
"GEMINI_API_KEY": "your-gemini-api-key"
}
}
```
### Claude Code
```bash theme={null}
/login
```
### Codex
```bash theme={null}
codex login
```
### Pi Agent
```bash theme={null}
/login
```